Tuesday, August 27, 2013

Candied Bacons

When Camden turned one year old, his weight plateaued. When he had his two year old checkup, his weight didn't change. So his pediatrician suggested that I visit with a nutritionist. During the visit, I was very proud to show her Camden's food journal. After all, they were healthy homemade allergy free diet. BUT she said that the food I gave him was very high in carb. She suggested that I adjusted his diet with more protein food. That was when I started to think about what high protein meals I could make. He loved to snack so what about snacks?

I made a lot of changes to his diet, from making beef broth to adding quinoa to jasmine rice. Making high protein snacks was a challenge. I remember the nutritionist suggested giving him bacons, ham, etc. But the corn free ones were hard to find. When I found out that Whole Foods 365 bacons was corn free, I was thrilled. Their bacons, as it turned out, weren't salty or anything special. Tasted like cooked fatty meat. Pretty boring!!!

While I was watching Unique Sweet (as I always do to be inspired), there was an episode that showed candied bacon cupcakes. Ouuu... sounded interesting. There was no recipes, just a quick description that the bacons were sprinkled with brown sugar then cooked in the oven. The sugar caramelized the bacons to crisp and to have that candied texture.

I decided to test it out, and the bacons were super addictive. They were sweet and crisp. Just like candy. Of course, I didn't write down my method of cooking the candied bacons. I just winged it every time. I burned about five batches along the way. After reading a few cookbooks on candied bacons and watching cooking shows on how to cook bacons, I came up with my own simple steps. Give my recipe a try and don't blame me if you eat the whole batch of candied bacons all by yourself. They really are addicting.

Candied Bacons

1 lb bacon slices
6 Tablespoons light brown sugar
  1. Preheat the oven to 400°F degree. Place a baking rack over a baking tray. Set aside.
  2. Spread the light brown sugar on a plate.
  3. Coat each bacon slice with light brown sugar.
  4. Arrange it on the baking rack.
  5. Repeat step 3 and 4. Note: Cooked bacons do shrink. Arrange them as close together as possible but not overlapping them. If I don't have enough room for the last 4 to 6 slices, I just add them after the first 10 minutes of cooking.
  6. Cook the bacons in the preheated oven for 20-30 minutes, turning each bacon slices every 10 minutes. Note: If the bacons are thin slices, they will cook faster, about 20 minutes. Keep an eye out on the bacons, so they don't burn.
  7. Once cooked, remove the bacons to a plate to cool. Do not leave them on the rack to cool or they will be difficult to remove. Enjoy them or keep the candy bacon in a tight container in a refrigerator for up to 5 days.
Cooking Note: In a hurry, cook the bacons under a broiler on HIGH or LOW setting. Whatever setting the broiler is on, keep an eye on the bacons. Every 2-3 minutes, you must check on them, or they will burn. I burned too many batches with this cooking method, but they cooked faster. I prefer to cook them as noted on my recipe above when I have more time (like while I'm having dinner or doing dishes).

Microwave bacon slices is another method of cooking candied bacons in a hurry. Placed bacons slices on top of microwavable plate lined with paper towel. Generously sprinkle light brown sugar on top of bacon slices. Place another paper towel on top of the bacons and microwave until crisp, 2 - 3 minutes. The bacons will be crispy after they are cool.

Keep in mind that the bacons will taste crispy the day they are cooked. I usually heat them up in the microwave for a few seconds. Not as crispy but chewy candied bacons.

Allergy Info: My candy bacon recipe is free from or can be made without dairy, eggs, corn, , legumes (soy), wheat, nuts, and fish.

Saturday, August 17, 2013

Marshmallow Fluff or Creme

Making marshmallow is super easy. Give my maple marshmallows recipe a try. Guess what's the best part of making these marshmallows? Licking the marshmallow right after it's whipped. The smooth, silky, and soft texture reminds me of marshmallow fluff. I always wondered if I could make the marshmallow stays fluffy for maybe a day or two. I tried making marshmallow with less gelatin, but with no luck. The marshmallow only stays fluffy for about five minutes.

When I ventured to supermarkets, I looked for a prepackaged marshmallow fluff. Found two brands. Both had questionable ingredients... corn syrup (GMO?), vanillin (fake vanilla?), artificial flavor (engineered marshmallow flavor?), artificial color blue (hmm... isn't marshmallow suppose to be white?). This is a very typical of my findings. Most of the prepackaged products have at least one questionable ingredient. With that said, I always end up making or baking something I've craved.

I definitely appreciate the authors who shared their recipes that can be made from scratch. When I came across Real Snacks: Make Your Favorite Childhood Treats Without All the Junk by Lara Ferroni, I was psyched. Finally, I can make and bake my kids' real snacks without additives I find in the prepackaged counterparts. The one recipe I was intrigued with was her marshmallow creme.

Here's what I noticed. When whipping meringue, the egg white mixture must be stiff peaked. The texture for marshmallow creme is actually at soft peak. I also was wondering about eating raw eggs. I researched this subject to make sure that I didn't food poison my kids. I found out that if a sugar mixture boiled at a high temperature and is added into the egg white, the egg white is cooked as it is being whipped. Another method is the same as making the seven-minute frosting where egg whites with other ingredients are cooked over a double boiler while whipping to soft peak.

Keep in mind that this marshmallow fluff or creme will separate, meaning that the sugar syrup will separate from the whipped egg white. When this separation happens, just whisk the fluff a few time before using. I only keep marshmallow fluff in the fridge for about three days. I usually use one large chicken egg white to make just enough for my kids' afternoon snacks. Feel free to double or triple this recipe and adjust the sweetness to your liking.

Marshmallow Fluff or Creme
adapted from Real Snack's Marshmallow Creme
serves 2-4

1/2 cup (4 oz) sugar
1 Tablespoon (0.5 oz) pure maple syrup
1 1/2 Tablespoons (1.5 oz) water
1 large egg white
  1. In a small pot, clip it with a candy thermometer.
  2. Add the sugar, maple syrup, and water into the pot.
  3. Whisk until just combine.
  4. Bring the mixture to a boil and lower the heat until the candy thermometer registers at 235°F degree.
  5. While the sugar mixture is heating, whip the egg white until foamy, about 30 seconds.
  6. When the sugar mixture registered at 235°F degree, slow add it to the egg white while the hand mixer is on a low speed (speed 1 if using Cuisinart HM-70 Power Advantage 7-Speed Hand Mixer).
  7. After all the sugar syrup is added, increase the speed to high (speed 6).
  8. Whip until the egg white is at soft peaks.
  9. Keep it in the tight container (mason jar) for up to 3 days.
Allergy Info: My marshmallow fluff is free from dairy or can be made without dairy, corn, legumes (soy), wheat, nuts, and fish.

Thursday, August 1, 2013

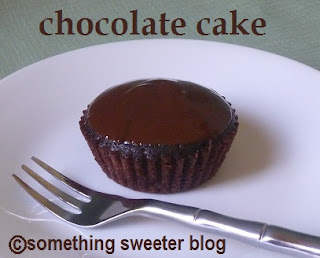
Chocolate Cake

I've tested so many cake recipes, and I've noticed that not all of the cakes came out tasted moist and fluffy without chicken eggs as part of the ingredients. While I was on Camden's allergy free diet and before I discovered that he could have quail or duck eggs, I came across the old-fashion chocolate cake recipe in the Cuisine at Home magazine. This chocolate cake recipe is free from dairy and eggs. It is definitely my go-to chocolate cake as it is very light, fluffy, moist, and perfect chocolaty taste.

Every time I bake this chocolate cake, my kids only want the cake itself. I had frosted the cake with all types of frosting: cream cheese, whipped cream, marshmallow cream, or chocolate ganache. It tastes great with or without frosting. Great with ice cream too.

This chocolate cake recipe can be made in a cake pan or 12-Inch Half Round Loaf Pan. I prefer baking them in cupcakes because they bake faster and easier for my kids to handle. Seriously, do I wanna wipe out a knife every time they ask for a piece of chocolate cake? Nope. Self-serving, baby!!! Mommy needs a break when she can get one.

The recipe can be double or triple. I always bake them just enough for a day or two as they taste best the day they are baked.

Chocolate Cake
makes 6 regular size cupcakes
adapted from Cuisine at Home's Old-Fashion Chocolate Cake

3/4 cup (3 oz) all-purpose flour
5 to 6 Tablespoons (0.3 oz) baking cocoa powder
1/2 teaspoon baking soda
1/2 cup (4 oz) hot water
4 Tablespoons (2 oz) granulated sugar
1/2 teaspoon instant coffee (optional)
1/4 cup (2 oz) vegetable oil
1/2 Tablespoon (0.2 oz) rice vinegar
  1. Preheat the oven to 350°F. Line a 6 cup regular muffin pan with cupcake liners. Set aside.
  2. In a large bowl, sift together flour, baking cocoa powder, and baking soda. Set aside.
  3. Microwave water until hot, about one minute.
  4. Whisk in sugar and instant coffee (if using) until dissolved.
  5. Mix in the oil and vinegar.
  6. Pour the sugar water into the flour mixture.
  7. Whisk until the batter is smooth and without any lump.
  8. Divide the batter evenly into the prepared muffin pan.
  9. Bake until a tooth pick inserted in the middle of the cupcake comes out clean, about 15 minutes. (If the cupcakes aren't baked, turn off the oven and let them sit in the oven for another 3 to 5 minutes. Since this recipe has no eggs, the cake will bake pretty fast.)
  10. Transfer the pan to a wire rack to cool completely.
Chocolate Ganache
makes enough to frost 6 cupcakes

1/4 cup (2 oz) chocolate chips
1 teaspoon coconut oil or palm shortening
  1. In small bowl, add chocolate chips and microwave for 30 seconds.
  2. Add in the oil.
  3. Microwave 9 seconds then whisk the chocolate. Repeat this step until the chocolate chips are melted. The chocolate ganache has the smooth texture.
  4. When the cupcakes are cooled to handle, hold the bottom of a cupcake and dip the top nto the chocolate ganache frosting.
  5. Serve right away or keep them in an air tight container at a room temperature for up to 3 days.
Allergy Info: My chocolate cake recipe is free from or can be made without dairy, eggs, corn, legumes (soy), nuts (not coconut or palm), and fish