Monday, March 30, 2015

Carrot Cupcakes

My kids keep reminding me that veggies taste too plain. Of course, I still place a few pieces of carrots, cucumber slices, or whatever I can get a hold of on their dinner plates.

Recently, I'm so in luv with organic carrots. They taste super sweet and the crunch is very satisfying. I'd go through two pounds of carrots per week. Snacking during dinner making is a good way to tame my hunger. The best thing about carrots? Organic rainbow carrots!!! See, there is such thing as eating a rainbow of colors.

Since it's nearly Easter, I've been thinking of baking a carrot cake. I decided to test out William Sonoma's carrot cake last week. After I modified the original recipe to make it dairy and legume free, I found the carrot cupcakes were very moist. Since we cannot have dairy, I went ahead and frosted the cupcakes with marshmallow fluff. The carrot shaped cookies were just F-U-N.

I remember baking my kids some carrot cupcakes before, and they weren't big fans. This time, they devoured them. I know they don't like to eat veggies but having them eat something in my baked sweet is good enough.

Carrot Cupcakes
adapted from William Sonoma's classic carrot cake
makes 12

2 large eggs
1/3 cup (3 oz.) sunflower oil
1/3 cup (3 oz.) granulated sugar
2.5 oz.) light brown sugar
1/4 cup (2 oz.) coconut cream
1 teaspoon apple cider vinegar
1 cup (4 oz.) all-purpose flour
1 teaspoon baking powder
1 teaspoon baking soda
1 teaspoon ground cinnamon
1/4 teaspoon ground nutmeg
1/3 cup (1 1/2-2 oz.) shredded carrots

Frosting
1 marshmallow fluff recipe
1/4 cup (2 oz.) shortening
carrot shaped cookies (optional)
  1. Preheat the oven to 350F. Line the regular muffin pan with cupcake liners or spray it with a cooking oil. Set aside
  2. In a large bowl, whisk together the eggs, oil, sugars, coconut cream, and vinegar. Set aside.
  3. In a medium bowl, shift together the flour, baking powder, baking soda, cinnamon, and nutmeg.
  4. Add the shredded carrots to the flour mixture and coat well.
  5. Add the flour mixture to the egg mixture.
  6. Whisk until the batter just combine.
  7. Divide the batter equally in the prepared pan.
  8. Bake in the preheated oven until an inserted toothpick comes out clean, about 15-18 minutes.
  9. Let the carrot cupcakes cool on the cooling rack.
  10. For the frosting, makes the marshmallow fluff as directed. Then add the shortening and mix well.
  11. Frost and decorate the cupcakes with shaped carrot cookies. Enjoy!!!
STORING: Without frosting, keep the cupcakes in a container at a room temperature for up to 3 days or in the fridge for up to 5 days. With frosting, keep them in a container in the fridge for up to 2 days.

Allergy Info: These carrot cupcakes are free from or can be made without dairy, corn, legumes (soy), nuts (not coconut), and fish.

Monday, March 23, 2015

Perfect Hard-Boiled Eggs

You know how some people admit that they can't cook, not even boil a pot of water. Well, if they can boil water, do you think they would know how to cook boiled eggs? It seems pretty simple. And it is.

For breakfast, my husband eats boiled eggs every day. He would let the eggs cooked in the boiling water forever... well, ten minutes top. Then he just let the eggs sit in the boiling water after he turned off the heat. He still does it this way.

So the white eggs tasted weird, rubbery. The yolks have that gray coloring around the edge. Not only they looked odd but they tasted like paste. It was no wonder my kids and I didn't like boiled eggs.

I've been reading and watching videos on the internet about tips and tricks on cooking just about anything. Several websites suggested different method of cooking the perfectly boiled eggs. One suggested putting the eggs in a muffin pan and bake for 30 minutes in 350F degree oven. Really... no kidding. I never tried this method just because it isn't cost effective to me.

So I tested out different method and fell in luv with this one. Let the water comes to a full boil, turn off the heat, then let the eggs sit in the boiling water for awhile until they are cooked. Fool-proof every time. Now the question is... what are you going to do with the perfect hard-boiled eggs?

Perfect Hard-Boiled Eggs
makes as many as you like
  1. Place the eggs inside the pot.
  2. Fill the pot with room temperature water until the eggs submerge in the water.
  3. Cover the pot and bring the water to a full boil. NOTE: Full boil means to the water is bubbling and rolling for 60 seconds.
  4. Once the water boil, turn off the heat. NOTE: For gas stove, just leave the pot on the burner. For electric stove, place the pot on a cool burner, away from heat.
  5. With the cover on, let the eggs sit in the boiling water. For extra large eggs, it will take 10 minutes to cook the eggs. For large eggs, it will take 7-8 minutes to cook the eggs.
  6. Once the timing goes off, replace the hot water with cold water.
  7. Take the eggs and place them on a towel to air dry.
  8. Now cut the eggs and see how perfectly boiled eggs you just cooked. Enjoy!!!
STORING: These boiled eggs can be kept in a fridge for up to 5 days.

Allergy Info: Well, it's obvious. Hard-boiled eggs are just that, eggs.

Monday, March 16, 2015

Angel Food Cake

I was eyeing the William Sonoma's angel food cake recipe for months, and I seriously wanted to test this recipe. At that time, I was intimidating by the process of whipping egg whites. After making so many meringues, whipping egg white is like... well, you know. If you are a novice to the egg whipping technique, check out my tips and tricks to whipping up the perfect egg whites.

After I baked the angel food cake, I wondered why I waited so long to bake such an easy dessert. Brek and I luv the cake's texture. It was rather fluffy and light like clouds. Wait, I never tasted clouds before. Hmm... you just have to bake one and find out if it tastes like clouds.

Last year, I baked... oh maybe... 3 angel food cakes. This cake only needs egg whites, so I was having that dilemma, "what am I going to do with the egg yolks?" Planning is everything. It is the only way to not waste any food. I usually made pudding, pastry cream, ice cream, or saved them for breakfast scrambled eggs. Keep an egg yolk to make egg wash. Another thing to keep in mind is to make sure that I have enough time to spend in the kitchen as I am most likely to commit to 2 to 3 recipes.

Angel Food Cake
adapted from William Sonoma and America's Test Kitchen
makes 2 mini tube cakes

3 egg white
1/2 teaspoon cream of tartar
1/3 cup (2.3 oz) granulated sugar
4 Tablespoons (1.2 oz) all-purpose flour
1/2 teaspoon lemon or lime juice
1/2 teaspoon vanilla extract
  1. Preheat the oven to 325F degrees. If the mini tube pans don't have a removable bottom, place a parchment paper at the bottom of the pans.
    TIP: Cut the white cupcake liner to fit the bottom of the tube pans. Since most of the cupcake liners are dusted with corn starch, use parchment paper if you are sensitive to corn.
  2. In a cleaned and dried large bowl, place the egg whites with cream of tartar.
  3. Using a hand mixer on high speed, beat the egg whites until soft peaks form. NOTE: If using Cuisinart hand mixer, use speed 7 (the highest speed).
  4. Sprinkle half of the sugar on the side of the bowl.
  5. Beat the sugar into egg whites for 10 seconds. Repeat with the rest of the sugar.
  6. Add lemon juice and vanilla extract.
  7. Beat the egg whites until firm peaks form.
  8. Gently fold in half of the flour into the whipped egg white. Repeat with the rest of the flour.
  9. Divide the batter evenly into the prepared mini tube pans.
  10. Tap the pans on the counter top about 10 times to get rid of air bubbles.
  11. Bake in the preheated oven for exactly 30 minutes.
  12. Let cool in the cooling rack for at least an hour. NOTE: This cooling stage is optional. When I removed the cake while it was still warm, the cake didn't hold the tube shape and had several finger indentations. Still tasty!!!
  13. Run a thin knife around the edge of the tube pan. Run a toothpick in the center of the tube pan.
  14. Gently twist the top of the cake to loosen it from the pan. Then invert the cake onto a plate. Enjoy the angel foods cake with fresh fruits, pastry cream, ice cream, or melted chocolate. Brek luvs them plain, and I do too.
STORING: Keep the angel food cakes in an air tight container at a room temperature for up to 3 days. (I bet the cakes will disappear into somebody's tummy as soon as they come out of the oven.)

Allergy Info: This angel food cake is free from or can be made without dairy, corn, legumes (soy), nuts, and fish.

Monday, March 9, 2015

Spaghetti Pie

This year, National Pi Day falls on March 14th. Notice it's "Pi" not "Pie". Funny, right? Brek suggested that I bake a pie with a Pi symbol for my blog. Maybe sweet hand pies. But I want to blog about a unique savory pie, a spaghetti pie.

After showing my kids Marc Murphy making his cheesy spaghetti pie on The Best Thing I Ever Made, they wanted them for dinner. It was a challenge because we couldn't eat all the cheeses that Murphy used. We could have goat or sheep milk products. So I decided to test his recipe using manchego cheese.
 
The spaghetti pie held its shape really well. The eggs did the trick. Without cheese, I absolutely think this is still possible. If we can't decide what's for dinner, spaghetti pie is always a great option. Plus, they are great for school lunch. This mommy luvs easy meal.

Spaghetti Pie
inspired by Marc Murphy's cheesy spaghetti pie
serves 4-6

1 pound cooked spaghetti
4 large eggs
2 1/2 cups shredded manchego cheese, divided
1 teaspoon sea salt
1/4 teaspoon ground black peppers
  1. Cook the spaghetti according to the direction on the package. Drain and let cool on a baking sheet. Set aside to cool completely. TIP: Cook the spaghetti in advance and set aside to cool.
  2. Heat the 10 inch frying pan on a medium-low heat.
  3. In a large bowl, whisk the eggs.
  4. Add 1 1/2 cups of shredded cheese and mix until combine.
  5. Add the spaghetti.
  6. With your hands, coat the spaghetti with the egg and cheese mixture.
  7. Sprinkle about 1/2 cup of cheese on the hot pan.
  8. Add the spaghetti into the pan, making sure the pasta is spread out evenly like a pie.
  9. Cook the spaghetti for 4 minutes.
  10. Transfer the spaghetti pie on to a plate.
  11. Sprinkle another 1/2 cup of shredded cheese on to the hot pan.
  12. Place the uncooked side of the spaghetti over the cheese.
  13. Cook the spaghetti for another 4 minutes.
  14. When done, transfer the spaghetti pie on to the cutting board.
  15. Cut the spaghetti pie into wedges. Enjoy while they are warm.
STORING: For leftover spaghetti pie, keep them in a container in a fridge for up to 3 days. Warm them up for 30 to 60 second in a microwave.

Allergy Info: These spaghetti pie is free from or can be made without dairy (not sheep), corn, legumes (soy), nuts, and fish.
 

Monday, March 2, 2015

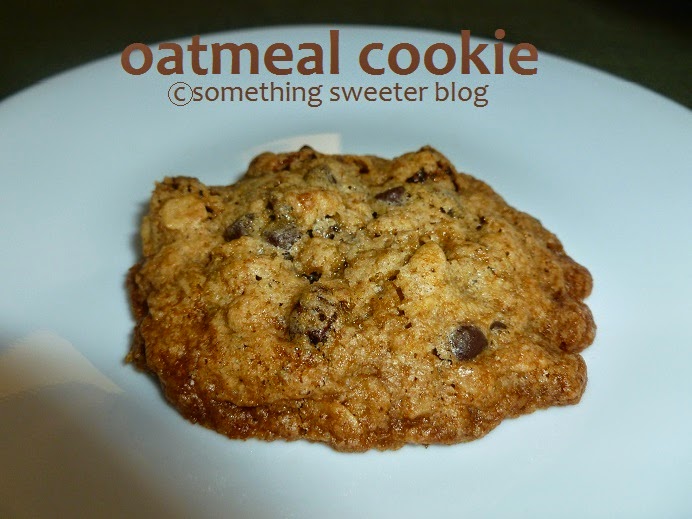
Oatmeal Cookies

Chocolate chips cookies or oatmeal cookies??? Doesn't matter which one you like, they both are the easiest sweets to bake. The cookie dough freezes well, so there you have it. Make a batch of cookie dough and freeze them until... poof... fresh baked cookies in about 15 minutes (excluding preheating the oven and cooling the cookies time). I know life without cookies is just painful.

A few reasons why I luv my oatmeal cookies recipe. First, I can mix and match the adds-in. This makes it easy for me to bake different flavor oatmeal cookies. Some of my favorites combinations are chocolate chip and raisins, raisins and cranberries (perfect for the Fall), walnuts or other nuts and raisins, or just raisins. Whatever adds-in you choose, be sure the total amount is between 1/4 cup to 1/3 cup.

Second reason, oatmeal cookies for breakfast. Yeah, you know, instead of oatmeal in a bowl, have it as cookies. Click here for chocolate chip cookies recipe. They are also great for breakfast cookies. If you are avoiding gluten, try the quinoa oatmeal cranberry cookies.

Oatmeal Cookies
adapted from William Sonoma's oatmeal-chocolate chips cookies
makes 20

1 large egg
1/4 cup (2 oz) granulated sugar
1/4 cup (1.7 oz) light brown sugar
1/4 cup (2 oz) coconut oil or palm shortening
1/4 cup (2 oz) all-purpose flour
1/4 teaspoon baking soda
1/4 teaspoon ground cinnamon
pinch of ground nutmeg
3/4 cup (2.2 oz) old fashioned rolled oats
1/4 - 1/3 cup of the following options (mix and match to your liking): raisins, chocolate chips or chunks, dried fruits, chopped nuts of choice, or come up with your own adds-in
  1. Line a nonstick matt or parchment paper over the baking pan. Set aside.
  2. In a large bowl, whisk together the egg, sugar, and coconut oil or palm shortening. Set aside.
  3. In a small bowl, mix together the flour, baking soda, cinnamon, nutmeg, rolled oats, and your preferred adds-in.
  4. Add the rolled oat mixture into the egg mixture.
  5. Combine everything using a fork or a whisk.
  6. Using a small scooper, scoop them into a prepared baking pan. TIP: Place the cookie dough as close together as possible to save room. Remember, they are only needed to be frozen.
  7. Freeze the cookie dough for at least 30 minutes. TIP: After the cookie dough is frozen, transfer them to a plastic bag, label, and keep them frozen for up to 6 months. When ready to bake, follow the next step.
  8. Preheat the oven to 350F degree.
  9. On a prepared baking pan, arrange the cookie dough so that they are 1-2 inch apart. NOTE: I usually bake about 5-6 cookies at a time. I place the rest of the cookie dough in a freezable bag.
  10. Bake in a preheated oven until golden brown around the edges, about 13-15 minutes.
  11. For crispy oatmeal cookies, turn off the oven but leave the cookies in the oven for another 3-5 minutes.
  12. Transfer the cookies to a wiring rack to cool completely. Enjoy them for breakfast or snack. Perfect for lunchbox too. 
STORING: Keep the oatmeal cookies in an air tight container at a room temperature for up to 3 days.

Allergy Info: These oatmeal cookies are free from or can be made without dairy, corn, legumes (soy), nuts (not coconut or palm), and fish.