Saturday, May 5, 2018

Chicken Breakfast Sausage Taquitos

Hey, peeps!!! Guess what? Easy peasy brunch... breakfast sausage taquitos.

How did I come up with this recipe? Well, I forgot to make my kolache dough and wanted to make breakfast with chicken breakfast sausages. Saw flour tortilla I bought a few days ago from Trader Joe's. Then I had a lightbulb moment... taquitos. Yeah, why not? 

When buying sausages, look for something without sodium nitrites. I found the Never Any's chicken breakfast sausage at Aldi. It is the cleanest breakfast sausage I found so far and trust me... I've searched for new products all the time. You know, I just want something as a backup when life gets too hectic.

Let's get cooking!!!

Chicken Breakfast Sausage Taquitos
makes 7 

8 homemade or store-bought flour tortilla
cooking oil
toothpicks
  1. Place a cooling rack over a baking tray. Set aside.
  2. Heat 1-inch deep of cooking oil in a heavy bottom pot.
  3. Cut the flour tortilla slightly shorter than the sausage.
  4. Roll the sausage tightly around tortilla.
  5. Secure with a toothpick.
  6. Repeat until all breakfast sausages are wrapped around the tortilla. 
  7. Deep-fry in the hot oil until golden brown on all sides.
  8. Place the chicken breakfast sausage taquitos on the cooling rack allowing them to drain.
  9. Enjoy them while they are warm.  

Monday, March 26, 2018

Coffee Ice Cream (Dairy Free)

What's not to like about making my own ice cream? Not a single thing!!!

I came up with the coffee ice cream recipe many moons ago. The original recipe was made with dairy condensed milk, so I wasn't inspired to blog about it. For one thing, I didn't wanna blog about dairy ice cream. I mean, I can just buy dairy ice cream pretty much anywhere. I wanna share allergy-friendly recipes. You know, the food that I can't find in the stores. The food that I have to make it on my own.

Months ago, I found coconut condensed milk while browsing the health food store. Right then and there, I had a lightbulb moment. Dairy free coffee ice cream for Brek. DONE!!!

What's else to blog about. Let's do it!!! With less than 20 minutes, I present you... dairy free coffee ice cream. And by all mean, sprinkle some crispy bacon on top. I did, and it was... well, you try it and let me know how you like it. Or try other toppings. The possibilities of adds-in are endless.

Coffee Ice Cream (Dairy Free)
serving 4 - 6

2 1/2 cups (20 oz.) coconut cream
2/3 cup (5 oz.) coconut condensed milk
2 Tablespoons (0.3 oz.) instant coffee granules
crispy bacon or your favorite toppings (optional)

Use the ice cream maker
  1. In a large (4 oz.) cup with a spout, whisk all of the ingredients together.
  2. Pour the coffee mixture into the ice cream maker's freezer bowl.
  3. Turn on the machine and allow the coffee mixture to churn for 15 to 20 minutes.
  4. Enjoy the soft serve coffee ice cream right away, or scoop it into a freezable container and freeze it for an hour or overnight.
No ice cream maker? No worries...
  1. In a large bowl, whisk all of the ingredients together.
  2. Transfer the coffee mixture to the freezable container.
  3. Freeze the coffee mixture for an hour.
  4. Take out the soft serve coffee ice cream and beat it with a fork.
  5. Put the coffee ice cream back in the freezer.
  6. Freeze it for four hours or overnight before serving. Enjoy it with your fav toppings!!!
STORING: Keep the coffee ice cream in an airtight freezable container for up to 3 months.

Allergy Info: This coffee ice cream is free from dairy, egg, corn, legumes (soy and peanuts), wheat, nuts (not coconut), and fish. I've used Aroy-D coconut cream, Nature's Charm coconut condensed milk, and Trader Joe's 100% Columbian Instant Coffee.

Thursday, September 21, 2017

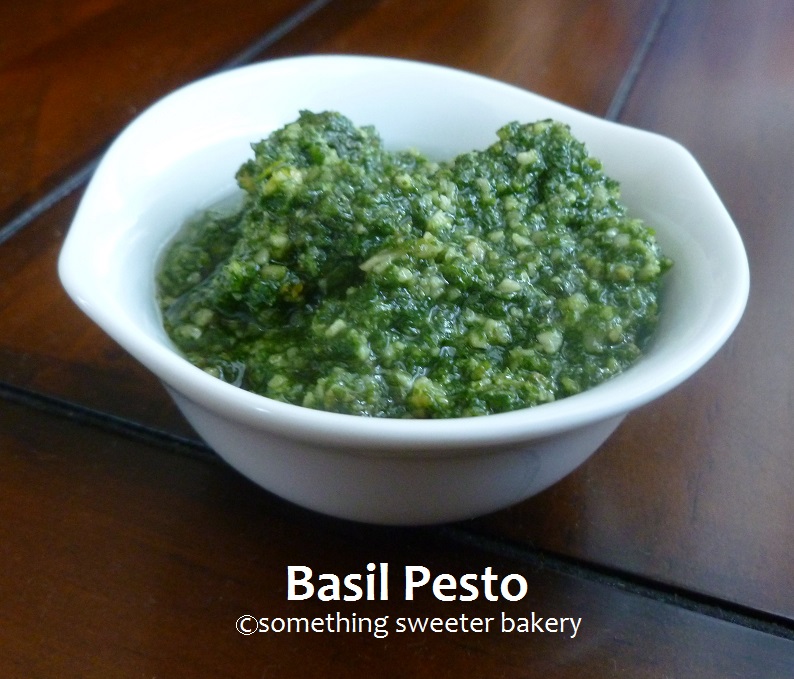
Basil Pesto

After scanning through too many cookbooks for school lunch ideas, I came across a lot of recipes calling for pesto. For cold lunch, pesto pasta is a great option. Of course, all of the prepackaged pesto have some sort of cow cheese, something that Brek tries to avoid.

I decided that it was time to learn how to make my own pesto. After reviewing recipes after recipes, pesto is nothing more than basil leaves and oil with added nuts and cheese. With my homemade pesto, I just skip the cheese and use whatever nuts I have at the time. I have to admit that I prefer almonds over other nuts.

The possibility of using basil pesto is endless. I added it to pasta for my kids' cold lunch. It's a great flavor bomb in stir-fried noodles (Italian style), soup, or pasta sauce.

Be sure to add lemon juice so the pesto will stay brightly green. Feel free to sub other nuts or skip the nuts. Sub other oil too. Because all of the ingredients aren't cooked, use organic ingredients if possible. And save the basil stems (in the freezer) to add to pasta sauce to up the flavor.


Basil Pesto
makes about 1 cup

2 large garlic cloves (peeled)
4 cups fresh basil leaves (washed, dried, and stemmed)
1/2 cup (2 oz.) sliver almonds
1/2 teaspoon sea salt
1/2 cup (4 oz.) sunflower oil
zest from 1 lemon
1 teaspoon lemon juice
  1. In a food processor, add garlic cloves and pulse about 10 times until the garlic is coarsely chopped.
  2. Add basil leaves, almonds, and salt.
  3. Pulse until the thick green sauce is formed.
  4. Add oil, lemon zest, and lemon juice.
  5. Pulse a few times to combine.
  6. Transfer to an airtight container and keep in the fridge for up to 5 days or in the freezer for up to 3 months.  
Allergy Info: My basil pesto is free from dairy, egg, corn, legumes (peanuts and soy), wheat, and fish.

Monday, August 28, 2017

Hurricane Harvey

Now that Hurricane Harvey has downgraded to Tropical Storm Harvey, I was just thinking earlier that I should just blog about this experience because, in a way, it's kinda funny.  

Tornado warnings. I slept through the first night when Harvey made landfall in my area. The next morning I saw too many alerts on my phone which I left it in my office. Then my husband said, "My phone kept beeping last night." We had no idea. And more warnings that day and that night. Yes, I had my phone with me the next night.

Eating off whatever that was in the fridge and freezer... just in case of power outage. No foods should go to waste. I have to say, we've saved a lot of money in the last 4 days.
Just wanted to eat carbs... chips, pita crackers, ice cream. My kids wanted to eat the same too. Wonder if it was stress eating.

Kids could still play with their friends... online. Thank you for no power outage. Then I heard my teen told his little brother that they needed to get up and do jumping jacks, saying "We can't sit around too long."

Heard my teen continually telling his friends, "The world is coming to an end." Then his little brother said, "I'm scared." And the first time he told his friend this, his little brother decided to take his iPad to the shelter and stayed there. His mommy was checking the radar and tornado warning status. Then his daddy said, "Camden, why are you sitting in the bathroom?" Bet you never said that to your kids.
As soon as the rainwater was halfway up the driveway, we did what was called "haul ass!!!" We didn't expect to flood. But we prepared for the floods within 2 hours. Talk about teamwork!!! (But I found my purse on the floor near the front door the next morning. How that get there?)

My mom messaged me via LINE app that there was a flood in Thailand a few weeks ago and now it was our turn. The world was coming to an end, and she didn't understand any of it. (Hmm... sounds familiar...)

Current situation? It's Monday, August 28th, 4:00pm.
The street in front of my house is still flooded... a tiny river. Wonder if I can make a hefty profit for my house now that it is a waterfront property.

See the pic... my neighbors took advantage of the new river.

Still rainy and very windy and feeling like it's Autumn. So cool outside. I kinda want to put up Fall decorations. Just last week, I was telling my friend who lives on the east coast that I wish I have Fall temperature sooner. But in Texas, Fall temp is around November. See, my wish came true. Camden was super happy when he felt the cool breeze.
You know that song "It starts to feel a lot like Christmas." Well, it starts to feel a lot like Autumn. (sigh) I need to have something pumpkinee which mean... more carbs? Hmm... pumpkin scones for dinner?
Update: As of Tuesday, August 29th, 2pm, streets are all dried up. Sunny a bit too. Feeling the Autumn wind.
We enjoyed pumpkin scones, boiled eggs, and chocolate milk with mini marshmallows for dinner last night, taking in our waterfront view. My teen also spotted our outdoor pet bunny. I noticed that he ate a slice of bread I left out for him. And our outdoor pet dove enjoyed leftover for breakfast.

From this experience, I would say my family and I tried to keep our sense of humor. But it is still stressful to watch the devastations on the news. So I am sending kick-ass energy to all people who are still under a lot of stress.


Update: As of Wednesday, August 30th, 2pm, streets outside my neighborhood were now passable. I was able to take my kids out and volunteered for pet rescue. Brek, Camden, and their friend, Winnie, organized and bagged blankets, cleaned dog crates, unloaded donations out of the cars. Camden and Winnie wished he was able to walk one of the dogs. When I asked, the dogs were being dropped off to take to the center or foster care. Those poor dogs looked so scared. Overall, my kids felt good that they did something great for the community.

Sunday, July 16, 2017

Fruit Jam

Do I really need to blog about fruit jam? Seriously though. What's to talk about? Well, for one thing, what comes in a jar is not always just fruits. So here I go again. Talking about citric acid in the added pre-packaged food. What to do? Make my own, of course.

My dad luvs jams, especially blueberries. When he visited two years ago, he asked me to teach him how to make it. You know, the only ingredients in the jam should just be fruits and sugar. That's it. Just simmer the fruits of choice until they cook down. Then into the blender. Then let the fruit jam becomes nice and cold in the fridge (unless you like it warm). And there you have it... fruit jam.

Some recipes may ask for sliced apples as pectin. From my experience, fruits jams don't need anything. Once the sugar is cooked down, it will firm up enough to spread. So skip the apples. Something less to worry about, right?

Fruit Jam
make as much as you like

1 - 2 cups fruits of choice (berries, peaches)
1/4 cups granulated sugar (more or less to taste, you decide)
  1. Wash fruits or berries. Take out stones and roughly chop if needed.
  2. In a heavy bottom pot, add the fruits of choice with sugar.
  3. Simmer until fruits are cooked down, about 15 minutes or more.
  4. Set aside to cool down.
  5. Add the fruits into the blender and blend until no chucks are visible.
  6. Transfer the fruits into a mason jar.
  7. Keep in the fridge for up to 2 weeks, or add pretty label if it is for gifting. Remember to add expiration date too. Enjoy!!!
Allergy Info: This fruit jam is free from dairy, egg, corn, legumes (peanuts and soy), wheat, nuts, and fish. If possible, use organic berries and fruits.

Saturday, June 24, 2017

Banana Fritters

I've been thinking about breakfast recipes a lot lately. So sick and tired of pancakes, waffles, and French toasts. Want something different.

Then I came across Bobby Flay's Banana Foster Beignets recipe in his brunch cookbook. Since I had 2 ready to bake bananas, I decided to make banana fritters for breakfast.

When I reread Bobby's recipe, I was wondering why he didn't add an egg. I mean beignets are usually yeast dough. But without eggs, I don't think they will turn out fluffy. Kinda strange.

So I modified his recipe by adding an egg. I ran out of large eggs or I went with extra large. I'll try large eggs next time and see if the texture makes a difference. I also added less sugar because I knew my kids would sprinkle a lot of powdered sugar until their fritters look like they are covered in snow.

When I think of beignets, I'd think of deep-fried yeast dough. You know the New Orleans beignets. I renamed this dish to a fritter because it has that doughnut taste to them. Well, whatever its name, my kids enjoyed them with cold glasses of goat milk. I had mine with morning coffee. Good life!!!

Banana Fritters
serve 3-4
adapted from Brunch at Bobby's Banana Foster Beignets

2 ripe bananas (7 oz.)
1/4 cup (3 oz.) granulated sugar
3 Tablespoons (1 oz.) coarse sugar
2 Tablespoons (1 oz.) coconut cream
1 extra large egg (2.1 oz.)
1 cup (4 oz.) all-purpose flour
1 teaspoon baking powder
1 teaspoon ground cinnamon
pinch ground nutmeg
cooking oil for deep frying
powdered sugar for serving
  1. Place a cooling rack over a baking pan. Set aside.
  2. Pour cooking oil (about 2 inches deep) into a heavy bottom pot.
  3. Heat the oil until the candy thermometer registers at 350F.
  4. In a large bowl, mix together bananas, sugars, coconut cream, and egg.
  5. In another bowl, whisk together flour, baking powder, cinnamon, and nutmeg.
  6. Whisk the flour ingredients into the banana ingredients until there are no lumps.
  7. Using a small scoop, drop about 4-6 scoops into the oil.
  8. Deep fried until golden brown, about 3-4 minutes.
  9. Take the fritters out of the oil and on to a cooling rack to let them drain.
  10. Serve warm with a lot of powdered sugar. Enjoy!!!

Allergy Info: These banana fritters are free from dairy, egg, corn, legumes (peanuts and soy), nuts (not coconut) and fish. 

Sunday, May 7, 2017

Strawberry Banana Spinach Smootie

It's one of those days when goat milk is about to expire. Why do I always have this "about to expire" dilemma? With frozen strawberries and bananas, I asked my kids, "You guys want strawberry banana smoothie?" SURE!!!

My friend, Krissy, told me many times to add spinach to smoothie since they don't have any taste while they are healthy. So I added a few leaves into their smoothie. I asked my kids if they could guess the secret ingredients.

My kids couldn't tell. Camden drank half of his smoothie then sauntered into the kitchen to ask me what the secret ingredient was. After I told him it was spinach, he said he felt sick from the smoothie and could not finish it because of the spinach. I pointed out that he already drank half of it.

The point is... some kids (even grown ups) have some sort of psychological issue when it comes to food. I bet Camden would finish his smoothie if he didn't realize spinach leaves were added in. But I honestly tell my kids what they are eating. Why not. They need to know what they eat. If they like or dislike what they eat, then they can decide if they want them again next time.

Strawberry Banana Smoothie
serve 2-3

1 cups organic strawberries, frozen
1 medium banana, frozen
5-7 organic baby spinach leaves, stemmed
goat milk
agave to taste
  1. Add strawberries and banana into blender.
  2. Turn the blender on low while adding milk to the preference consistency.
  3. Add agave to taste.
  4. Serve with more frozen sliced strawberries. Enjoy!!!

Allergy Info: This smoothie is free from dairy (not goat), egg, corn, wheat, legumes (peanuts and soy), and fish. Look for frozen fruits without added additives like citric acid. For bananas, peel and cut into big chunks and free them for future smoothie.

Monday, April 10, 2017

Scrambled Eggs

Apparently, I didn't know how to scramble eggs. Yeah, seriously!!!

Last week, I watched The Kitchen on Foods Network. Chef Zakarian taught a lesson on how to properly scramble some eggs. He showed a bowl of "incorrectly" scrambled eggs and... hmmm... that could have been my scrambled eggs.

His basic tip was low heat and slow. He added a lot of dairy (butter and sour cream). Two ingredients that I don't often have at home because... well, we don't eat cow's products. I didn't even bother to find substitutes for them though. I mean, scrambled eggs should just be scrambled eggs, right?

I tested Chef Zakarian's proper scrambled eggs technique, using a wok instead of a pot. The thing is... all of my nonstick pans are no longer nonstick, so I have been using a wok for pretty much everything. So use whatever you can get your hands on... a pot or a pan. Just make sure it is big enough to accommodate the amount of eggs you want to scramble.

So I thought the proper scrambled eggs' texture was rather creamy... reminded me of a thick pastry cream. Brek didn't like it. He preferred firm texture. But Camden luved it. So you see... there is no such thing as THE proper scramble eggs. However, I do like the low heat and slow cooking method. For some reasons, the eggs didn't turn out gamey. Since Brek prefers firm texture, I cook the eggs a little longer. Easy peasy for my two food critics.

Even though I suggested sea salt, ground black pepper, and fine chopped herbs to taste, I don't add sea salt to my scrambled eggs. Just because we eat so much salt else where, especially snacking on sea salt chips. Mine usually has ground black pepper and herbs to my scrambled eggs. Brek has his scrambled eggs with only ground black peppers, and Camden prefers them naked. Still easy peasy!!!

Scrambled Eggs
make as many as you like
inspired by Chef Zakarian's The Proper Scrambled Eggs

as many eggs as you like
1/2 Tablespoon cooking oil
sea salt, ground black pepper, and/or finely chopped herbs to serve (optional)
  1. Heat a pan, a pot, or a wok in a very low heat.
  2. Drizzle a little bit of oil, about 1/2 tablespoon.
  3. In a bowl, whisk the eggs until smooth, about 30 to 60 seconds.
  4. Add the eggs into the pan. If the pan sizzles, turn down the heat.
  5. If using a whisk, continuously whisk the egg mixture until creamy. If using a spatula, continuously bring the partially cooked eggs from the edge to the center then turn once.
  6. Plate the scrambled eggs then add salt, ground black pepper, and/or herbs to taste. Serve them next to your fabulous breakfast options such as a slice of sour dough bread, hash brown, and BACONS!!!
Allergy Info: Scrambled eggs are free from everything except eggs. If you cannot have chicken eggs, see if you can tolerant duck or quail eggs. They both are available at the Asian groceries.

Wednesday, February 1, 2017

Nut Milk

If you're like me, you would want to purchase certain thing prepackaged. Save time to do other activities. Like almond milk.

For the life of me, I thought nut milk was difficult to make. After searching on line and reading variety of cookbooks, the recipes were pretty much the same. Nuts and water. Yeah, no kidding.

The idea is to soak the nuts until they get pretty soft. Then whirring the soft nuts with water in a blender. That's pretty much it. And the best thing about making my own nut milk is what I add in the blender is what I get.

Check out the prepackaged nut milk where a lot of other ingredients are added, like oil. I have no idea why would oil needed in milk. I mean, do you add oil to a bowl of cereal? I certainly don't want it in mine.


Nut Milk
makes as much milk as you like

1 part preferred nuts, such as hazel, cashew, or almonds
3 parts filtered water

For example, 1 cup of cashew to 3 cups of water would make 3 cups of cashew milk.
  1. In a large container, soak the nuts in the water.
    NOTE: Rinsing the nuts before soaking them is optional.
  2. Put the container in a fridge overnight.
    NOTE: There is no need to cover the container.
  3. The next day, add nuts and its water into the blender.
  4. Blend the nuts until creamy white, about 2-3 minutes.
  5. Put the strainer over a large container.
  6. Pour the nut milk over the strainer.
  7. Using the back of a spoon, press out the nut milk, scrapping the bottom of the strainer to get the nut cream.
  8. Nut milk is ready to enjoy as is. Add a little sweetener, such as agave or honey, is optional.
STORING: Keep nut milk in a container in the fridge for up to 5 days or in the freezer for up to 3 months.

Allergy Info: This nut milk recipe is free from dairy, egg, corn, wheat, legumes (peanuts and soy), and fish. When buying nuts, be sure to read the label carefully as some packaging will have a fine print of "manufactured in a facility that processes... (dairy, wheat, eggs, etc.).

Monday, January 9, 2017

Congee

Happy New Year!!!

It's been super cold the past few days. The coldest was 27F. Brrr... But I'm luving the cold if I can stay home. Plus, it's a nice change to the hot Texas heat.

So last Friday (January 6th), I happened to check the radar since it was pouring out. Then I saw it... snow in Sugar Land? Really? I was excited and Camden was too. We decided to venture out... in the cold... in the rain... in search of... SNOW!!!

It was about 45 minutes drive and once we got there, it was nothing but rain... sleet. Bummer. We stopped by Whole Foods instead and bought some pastries for treats and manchego cheese for future dinner. Still was a good trip. Just wish we saw snow flakes.

Since the temperature was dropping, I decided to put my slower cooker to good use. Thursday was making the chicken broth. Friday was cooking congee. After I posted the congee photo on my Facebook page, a lot of my friends asked what it was. Think of it as porridge. Creamy with no cream or milk added. It's an Asian dish with variation of added garnishes. I ate a bowl with pieces of fish with peanuts once and didn't care for the taste. Congee with ground pork was pretty tasty. The one I made last Friday was just chicken broth with Jasmin rice and cauliflower. Just because I've been wanting cauliflower soup for awhile now.

I was told to blend cooked rice in broth in a blender to make it creamy so no slow cooker is required. But the whole point of using a slow cooker is to spend less time in the kitchen. I prefer the dump-it-and-forget-it recipes. Easy pleasy. For my congee, I set the slow cooker on HIGH at around 9am. As soon as I saw the congee bubbling, around noon, I turned it to LOW until 5:30pm dinner.

And be creative with the garnishes and added proteins. My kids ate their congee with grilled hot dogs and potato chips. The top photo was my breakfast congee... over easy egg, scallion, cilantros, fried onions with a lot of hot sauce. Because I like my savory dishes spiceee.

Congee
serve 4-6

6-8 cups chicken broth
3/4 to 1 cup uncooked Jasmin rice
half cauliflower head, roughly chopped
1 inch peeled fresh ginger or 1-3 teaspoons ground ginger (add more for spicier taste)
1 teaspoon black peppers

Garnishes
fried onion
fried garlic
thinly sliced scallions
roughly chopped cilantros
fish sauce
hot sauce

Protein Options
fried or over easy eggs
shredded cooked chickens
crumbled cooked bacons (crunchy and in bits)
thinly slice beef
  1. Add all of the ingredients into the slower cooker.
  2. Set it on LOW for 6 hours or on HIGH for 4 hours.
  3. Stir and serve congee with garnishes and protein options. Add fish sauce and hot sauce to taste.
Congee is extremely hot right out of the slow cooker. Be careful when serving to kids. I spoon my kids' congee in bowls and let them sit out for at least 10 minutes before serving.

Allergy Info: My congee recipe is free from or can be made without dairy, egg (if not garnish with fried egg), corn, wheat, legumes (peanuts and soy), or nuts. If you have fish allergy, use sea salt to taste. If you can have legumes, soy sauce is a good alternative. Read the ingredients listed for pre packaged garnishes such as fried onions or hot sauce, as it may contain soy oil and/or corn derivatives. Or thinly sliced onions or garlic in hot oil until crispy. No hot sauce, no problems. Sprinkle ground hot peppers.

Friday, December 2, 2016

Kale Chips

I haven't really found the time to work on my food blog. Testing recipes now and then for my Something Sweeter bakery and for my cookbook. But you know how things go with having kids. I still have to cook and bake for them.

I've been wanting to post a healthy, easy snack recipes like Kale Chips. I remember one time I told my friend, Melissa, that I would like to bake some kale chips for our snack, and she told me she ate them before. Prepackaged and tasted horrible. When I visited her and made her some, she said they tasted better than prepackaged kinds. Nobody should buy kale chips anyway. They are easy to make. Plus, they taste best right out of the oven. Warm and crunchy.

I've seen a lot of recipes calling for spices, cheese, etc. But seriously, kale chips only need oil and sea salt. Less is more kinda snack. The oven temperature will be up to you. Some recipes called for very high heat 400F degree. Some were in between 300F degrees. My friend Nicole told me to go low and slow to keep the nutrients. So I tested this recipe with 225F degree. Nicole said to go even lower than that but I was too impatient. You decide the oven temperature. The idea is to make kale leaves crispy like chips.

Kale Chips
serve 2-3, depending on how much you make

a few organic kale leaves
cooking oil or spray (olive oil, safflower oil, or coconut oil)
sea salt
  1. Preheat the oven to the lowest setting, between 170F to 225F degrees.
  2. For each kale, remove leaves from stem then tear them in bite size pieces. Remover any hard stem on the leaves as well.
  3. Place the kale leaves on the baking pan.
  4. Spray the kale leaves with cooking oil or coat them with cooking oil.
  5. Bake in the preheated oven until crisps, about 30 minutes.
  6. Take the baked kale chips out of the oven and sprinkle with sea salt.
  7. Let the baked kale leaves cool then transfer them to a bowl. Enjoy!!! We actually love them with our family movie afternoon.
Allergy Info: The baked kale chips are free from... well... pretty much everything.

Friday, September 2, 2016

What's up?

So I've been MIA for a long while. Been working and taking care of my family. That's all. But a lot has been going on here...
 
Brek decided this year that he wanted to go to public school. And off he went to public high school. He's luving every minute of it... well, except lunch. I guess going from homeschooling to taking classes at a private school of less than 80 students to 2000+ public high school would be daunting to me. But it's like an adventure for him. He luvs the prep rally. He finally understood the grossness of school lunches. Now I have to deliver hot lunch a few times a week. Wouldn't it be nice if all schools have microwaves?
 
I decided to homeschool Camden this year. When I have to work to make deadlines, he'd sit next to me, playing games on iPad, singing, and sometimes even asking me to help him with some spellings. And it's been like that lately... work, school, work, school. And sometimes, Camden was so loud that I couldn't concentrate on what I was typing. Yup, I decided to videotape his singing. This one was pretty good. He luvs to beat bopping. But sometimes, I'd wonder if he was singing or was that just a lot of yelling.


I had a chance to take Camden to the library to homeschool him there for the first time. Took a picture of him with his backpack and his Scooby. He was so happy and excited. Plus, it was fun. Then that night, he kept playing with Daddy's Halloween wig. Daddy took a picture of him turning into a rock star. Check out my first meme.
 
 
I haven't baked much. My Something Sweeter bakery has been quiet. Nobody is ordering. Well, I haven't really advertised. I've been contracted with work remotely from home, so that is my focus right now. I didn't realize how much fun it is to actually have a job-job. Here's hoping my company has more projects for me to work on even after my husband finds work.
 
When I had to go into the office to turn in my files, I made time to bake. My coworkers seemed to enjoy my baked sweets. I mean, the sweets were always sold out. Good for my ego, you know what I mean? It's been a good excuse to make the time to bake cookies, brownies, or muffins. I want to bake them chocolate croissants one of these days. And sticky buns. These are yeast dough so they taste best the day they are baked. That will be tricky to bake and bring them into the office the same day. Hmm... I've been waking up at 6am every morning (some days even earlier... how about 5am). Maybe I can.
 
I'm thinking of baking something oatmeal. Definitely oatmeal cookies. Ate one at Whole Foods and it was really good. Couldn't figure out what was in it... tasted like caramel. But you know how that goes. It's gonna take awhile when testing recipes. I hope my kids won't mind taste testing them. By the way, Autumn is here. What are you guys baking? I've been craving bacons... but that has nothing to do with season changed. Well, I'm in Texas so it still feels like summer... hot and humid. Seriously though. If anything is always good with bacons, then bacons must be great any time of the year. Check out my maple bacon cupcakes. Umm... bacons...

Wednesday, March 9, 2016

Fried Sushi Rice Balls

Life has been keeping me super busy. After my parents went back to Thailand last month, all I've been doing is cleaning. On top of that, my husband still has a hard time landing a job, so we are on extra, extra "saving money" mode.

Before the laid off and downsizing our home, I already taught my kids to save on everything. Buy things when they are on sales. Turn off the lights when they leave the room. Instead of buying water bottles, use washable bottles. Plus, no plastic goes to wasteland. When it comes to leftover, reinvent them.

So for this post, I have you... deep-fried sushi rice balls. My dilemma is the leftover sushi rice. I saw a cooking show once where a chef cooked rice balls in his food truck. That made me wonder... if I could use the leftover sushi rice to make rice balls.

I came up with this recipe by trail and errors. But you know what, I got it right the first time!!! Not bad!!! You can double and triple the recipe to feed the crowds. Feel free to test the size of the rice balls too. I usually make them using a small scooper. Anyway, it really doesn't matter the size. Trust me. Who doesn't like fried food?!?!?

Fried Sushi Rice Balls
serves 3-4, depending on the size

2 large eggs, divided
2 cups (12 oz.) cooked short or medium grain rice
1 3/4 cups (7 oz.) panko breadcrumbs
1/2 Tablespoons onion powder
1/2 Tablespoons garlic powder
honey mustard dipping sauce
  1. Line a baking pan with a nonstick mat. Set aside.
  2. In a large bowl, whisk the egg.
  3. Mix in the breadcrumbs and cooked rice.
  4. Using an ice cream scooper (any size you want), form the rice into balls.
  5. Place them on the prepared pan and keep them in the fridge until ready to fry them.
  6. When ready, add oil to a heavy bottom pot with a deep-fried thermometer, about 2 inch deep.
  7. While the oil is heating up, line a baking pan with a wiring rack.
  8. Beat the egg in a small bowl. Set aside.
  9. On a large plate, mix together the breadcrumb, onion and garlic powder. Set aside.
  10. Once the oil's temperature reaches 350F degrees, dip the rice ball into the egg then coat it with breadcrumb mixture.
  11. Carefully drop it into hot oil and fry it until golden brown on all sides, about 1 minute.
  12. Continue with the rest of rice balls, making sure to fry them in batches and keeping the temperature at 350F degrees.
  13. Serve warm with honey mustard dipping sauce.
STORING: Because the rice balls are fried food, it's best to eat them the day they are made. Alternatively, keep them in a container in the fridge for up to 5 days. Reheat in a microwave. They won't be crunchy but still tasty.

Allergy Info: These rice balls are free from or can made without dairy, corn, legumes (peanuts and soy), nuts, and fish.

Saturday, February 6, 2016

Chocolate Bao

Nod if you like to eat anything that's stuffed... stuffed pizza (a.k.a calzone), stuffed croissants (a.k.a chocolate croissants), and fruity hand pie like my apple hand pie. See, all stuffed foods are fun to eat.

I posted steamed bao recipe about two years ago, and let me tell you. I've been having a lot of fun stuffed the bao with savory and sweet you-name-it-I'll-stuff-it items.

After teaching Grandpa how to make the bao dough, he decided to stuff the bao with something sweeter like chocolate and sweet taro root butter (that he magically cooked up one day).

I've steamed and baked the chocolate bao too many times, and my kids always ask for more. To no surprise, Camden asked Grandpa to stream some more chocolate bao. And he did... for lunch. For this Chinese New Year or Valentine's day, how about steaming these chocolate bao for someone special.

Chocolate Bao
makes 15 (2 to 2.5 oz. each)

1 my bao dough recipe
15 teaspoons semi-sweet or dark chocolate
  1. Make the bao dough according to my recipe's instruction.
  2. Cut out fifteen 1-inch square parchment papers.
  3. Place a steamer One the dough is ready, divide them into 15 equal parts.
  4. For each dough ball, roll it out into a small round.
  5. Place a teaspoon of semi-sweet chocolates.
  6. Gather up the edges of the dough and pitch to seal. TIP: When making more than one flavor, add a chocolate chunk on the top of the bun to label the filling.
  7. Place the dough seam side down on a prepared parchment paper and place it in the steamer.
  8. Steam the dough for 12 minutes. NOTE: Start the clock when the steam is visible.  
  9. Serve the bao warm. Keep them in the steamer to keep warm. 
STORING: Keep these chocolate bao in a container in the fridge for up to 5 days. Reheat by microwaving it for 15 seconds or steam it until warm.

Allergy Info: This chocolate bao recipe is free from or can be made without dairy, egg, corn, legumes (soy and peanuts), nuts, and fish. 

Monday, February 1, 2016

Classic BBQ Spareribs

Since Chinese New Year is coming up soon (Feb 8th), I would like to post a recipe that I tested many years ago, Classic BBQ Spareribs. I don't have a lot of say about this recipe, except that it is better than ordering a take out.

When my mom visited us three years ago, I made these BBQ spareribs for dinner. She luvs the sweet and salty taste, and she kept mentioning the smoky aromatic from the grill was awesome. Since she's currently staying with us, she asked me to make her some more.

The taste of sweet honey combined well with the salty soy sauce. With no food color, the spareribs still have the deep dark red color from the burnt sugar. Hey, who wants to eat red dye. These are betta for ya!!! The recipe calls for a lot of Asian ingredients. If you don't have them, no worries. I'll help you make do with typical Asian ingredients like soy sauce.

Now, let's talk about cooking these spareribs. I personally don't like an outdoor grill. Well, I like to eat anything off the grill but to have me grill anything outdoor is out of the question. I'm afraid of an open flame and propane tank. With my husband's help, my family's are able to enjoy these BBQ ribs. Without my husband's grill expertise, I'll have to rely on a broiler or a slow cooker. That's everything outdoor grill, by the way, not just ribs.

Classic BBQ Spareribs
adapted from The Chinese Takeout Cookbook
serves 6-8

3 Tablespoons honey
2 Tablespoons Chinese rice wine
2 Tablespoons ketchup
1 Tablespoon oyster sauce
1 Tablespoon dark soy sauce
1 teaspoon sesame oil
2 teaspoons garlic powder
1/2 teaspoon Chinese five-spice powder
1 rack of spareribs, about 3 pounds

Alternatively, skip the following ingredients if you cannot find them. Skip Chinese rice wine and no need to add an alternative. Omit the oyster sauce and add dark soy sauce of the same amount. If you don't have dark soy sauce, use regular or low sodium soy sauce instead. Be sure to use a really good ketchup like Whole Foods 365 or Sir Kensington brand. I find these ketchups to be the most flavorful.
  1. In a large bowl (with lid), whisk all of the ingredients together to make a marinade. Set aside.
  2. Prepare the spareribs by cutting them into 2-3 ribs.
  3. Coat the ribs with the marinade.
  4. Cover and place the whole bowl in the fridge overnight.
  5. When ready, grill the ribs using a charcoal or an outdoor gas grill. NOTE: My husband grilled these in both charcoal and gas grill. Both cooking methods make delicious ribs.
  6. Enjoy them while they are hot with jasmin or sticky rice or any sides.
STORING: Place the leftover BBQ spareribs in a container in the fridge for up to a week or freeze them for up to 3 months.

Allergy Info: These classic BBQ spareribs are free from dairy, egg, corn, wheat, and fish. Be sure to use wheat free (or gluten free) and/or corn free ingredients. For honey, be sure it is from wild flower fed bees as some honey is from bees that are fed corn syrup.

Tuesday, January 26, 2016

Almond Cookies (dairy and egg free)

My kids and I ate at a local Asian restaurant where a waitress brought some almond cookies with a check. I could tell that the cookies were not freshly baked. After tasting them, I was positive that they were prepackaged cookies with loaded of artificial ingredients.

After I mentioned this finding to my kids, Brek challenged me to make a healthier version. Challenge accepted!!!

The ingredients I used are pretty much the same as other dairy and egg free cookie recipes. Keep this in mind too if you wanna play with other flavor for cookies.

Taste testing. My kids said that my almond cookies were pretty close in texture to the prepackaged ones. The crisps were there because they were baked and devoured on the day they were baked. Flavor wise, they agreed that mine tasted better. Score!!!

Almond Cookies (dairy and egg free)
makes 16 cookies

1/4 cup (2 oz.) shortening
1/4 cup (1.8 oz.) light brown sugar
1/4 cup (1.8 oz.) granulated sugar
1/2 cup crunchy almond butter
1/2 cup plus 1/3 cup (3.7 oz.) all-purpose flour
1/2 teaspoon baking soda
16 raw sliced almond
  1. Preheat the oven to 350F degree. Line a baking pan with a parchment paper or a nonstick matt. Set aside.
  2. In a large bowl, mix together the shortening, sugars, apple sauce, and almond butter with a hand mixer until creaming.
  3. In a small bowl, whisk together the flour and baking soda.
  4. Add the flour mixture to the almond butter mixture.
  5. Mix it with the hand mixer until just combine.
  6. Using a small scoop, scoop the cookie dough on to the prepare pan, making sure they are about an inch apart.
  7. Press a raw sliced almond on top of each dough.
  8. Bake in a preheated oven for exactly 12 minutes.
  9. Allow the cookies to cool on a pan for 5 minutes then transfer them to a cooling rack to cool completely. Enjoy!!!
STORING: These almond cookies are best eating the day they are baked for the crisp. But they can be kept in an air tight container at a room temperature for up to 3 days.

Allergy Info: These almond cookies are free from or can be made without dairy, eggs, corn, legumes, and fish.

Monday, January 11, 2016

Blueberry Banana Muffins

Grandpa luvs anything muffins. He told me that he prefers muffins to a cupcake. Maybe it has something to do with breakfast. Grandma told me that he gets up at 6am, on the dot, to eat something with his coffee. So she told me to be sure that I bake him breakfast sweets.

At first, I didn't really know what to bake for breakfast. I did the easy muffins like my banana chocolate chip muffins. One day, while we were at Trader Joe's, Grandpa asked me if I could bake him something with blueberries. He luvs blueberries. DONE!!!

Basically, I modified my chocolate chip banana recipe. I had never baked blueberry muffins before because Camden is avoiding blue foods in his diet. With that in mind, I wasn't sure how the muffins would hold its flavor with just blueberry in them. So I went with two versions... 6 muffins with just blueberries... another 6 muffins with banana AND blueberries.

Everybody... Grandpa, Grandma, Brek, and I... totally agreed that banana blueberry muffins had more flavor. It definitely had to do with the flavor from the ripen banana. So there you go. When in doubt, try a few flavors with the add-ins. So glad I did.

Blueberry Banana Muffins
modified from William Sonoma's Banana Bread
make 6 regular size muffins

1 large egg
3 Tbs. (1.5 oz.) vegetable oil
1/4 cup (2.5 oz.) granulated sugar
1/2 (2.5 oz.) very ripe bananas, peeled and mashed
3/4 cup (3 oz.) all-purpose flour
1 teaspoons baking powder
1/8 teaspoon baking soda
1/2 teaspoon grounded cinnamon
1/8 teaspoon grounded nutmeg
1 cup (3 oz.) frozen wild or regular blueberries
  1. Preheat the oven to 350 F degree. Line the 6 regular size muffin pan with foil or paper liners. Set aside.
  2. In a large bowl, whisk together the sugar, oil, and egg.
  3. Add the mashed banana and mix again.
  4. In a small bowl, sift the flour, baking powder, baking soda, cinnamon, and nutmeg.
  5. Add the flour mixture to the banana mixture and whisk until just combine.
  6. Fold in the blueberries.
  7. Using a large scooper, divide the batter equally into the prepared muffin pan.
  8. Bake until the tooth pick inserted into the muffin comes out clean, about 18-20 minutes.
  9. Enjoy them while they are warm or at a room temperature.
STORING: Keep these banana blueberry muffins in a container at a room temperature for up to 3 days.

Allergy Info: These banana blueberry muffins are free from or can be made without dairy, corn, legume (soy and peanuts), nuts, and fish.

Friday, January 1, 2016

New Year's Resolution 2016


For the past two years, I was able to keep my New Year's resolutions because I set a realistic goal for each year. So what is my 2016 New Year's resolution?

2015 was life changing for my family. My husband was laid off from a job that he had for over 8 years because the oil industry's been doing poorly. We had to downsize and sold our home. It was very hectic. But we persevered and sold our home within 3 days on the market. I've continued to homeschool my kids. Brek is now a teen, 13 to be exact. Camden turned 6, but he seems to behave like he's a teen. On top of all this, we were unprepared for the health insurance crisis. My husband and I thought we would be okay with a year or two worth of saving. But a health insurance for a family of four makes a big dent in our savings.

My parents came to visit us in October. We asked if they can stay longer, so they're scheduled to leave at the end of February. I'm so thankful that they are here because they've brought perspectives to what we've been going through right now, reminding us what to worry about and mainly what not to worry about.

The first week after my husband was out of a job, he suggested that I went back to work full time so that we would receive a health insurance benefit. Seriously, who's gonna hire a mid 40 year old woman who's been out of workforce for over 12 years? And just exactly what job was I suppose to apply for?

That was when I realized that I needed to stop dreaming and to start doing something about my dream. I decided to research the Texas cottage law where a home baker can bake and sell sweet items from her home kitchen. It was pretty simple. I took a food handling license, spoke with a friend of a friend about the home based bakery business, asked my cousin to design a logo for my bakery, started retesting recipes and totaled up the costs, worked on my bakery on line menu.... and the list just went on and on and on.

Finally, my dream came true. I'm officially an proud owner of my own bakery, Something Sweeter. For 2016, my New Year resolution will be... working very hard to have a successful start-up bakery business. I also want to work on my first cookbook this year. I want to accomplish all this while I continue to homeschool my kids and be a stay-at-home mom. Because, let's face it, I like being at home and do the things I've been doing with my kids. If I can help my family's financially without losing that privilege, then that is all I need to do.

Visit my on-line Something Sweeter bakery at http://menusomethingsweeter.blogspot.com/

Cheer to 2016!!!

Sunday, December 27, 2015

Chocolate Croissants (dairy-free)

Every single time I stop by Whole Foods, I must have one of their chocolate croissants. For as long as I could remember, I really wanted to bake a dairy-free version so that Brek could enjoy them as well.

After I mastered the art of croissant dough, I ventured into baking variety of savory and sweet croissants. Nothing compare to chocolate croissants. They really do take the cake. Not only are they relatively easy to make, they are so addicting.

Making the chocolate croissants are pretty much the same technique as making mini-croissants. The difference between two of my recipes is the shape of the croissants. If you prefer the classic croissant shape, you can certainly make them that way. You may need to use less chocolate chunks. No change to baking time.

Ready to bake???

Chocolate Croissants
makes 8

1 croissant dough
1/4 cup or more for dusting
1/4 cup (2 oz.) palm shortening
1/2 to 1 cup chocolate chucks
1/2 cup warm water
1 teaspoon baking soda
  1. Line the baking pan with non-stick mat. Set aside.
  2. Roll the croissant dough out to about 9 by 15 inch. TIP: No need to be accurate as the dough will need to be measure and cut to size.
  3. Cut the dough into 8 equal pieces.
  4. Working with each piece at a time, place a row of chocolate chunks at the short end and fold the dough over them. (picture 1)
  5. Place one more row of chocolate chunks.
  6. Fold the dough over the chocolate until the small log is formed.
  7. Press to seal the edges.
  8. Place it in the prepared pan.
  9. Repeat with the rest of the dough.
  10. Allow the dough to rest in the fridge for 20 minutes. NOTE: In a hurry? Go head and preheat the oven while the dough is resting in the fridge (or at a room temperature during winter months).
  11. Once ready, preheat the oven to 400F degrees.
  12. Make the baking soda wash by dissolving the baking soda to warm water.
  13. Brush the baking soda wash over the croissant dough.
  14. Bake in the preheated oven until golden brown, about 15 minutes.
  15. Allow the croissants to rest for 5 minutes. Enjoy them while they are piping hot or warm. TIP: For more chocolatey flavor, drizzle more melted chocolate over the chocolate croissants.
STORING: Keep the chocolate croissants in a container at a room temperature for up to 3 days or in the fridge for up to 7 days.

Allergy Info: These chocolate croissants are free from or can be made without dairy, egg, corn, legume (soy or peanuts), nuts (not palm), and fish. If you don't have dairy allergy, you can go ahead and use the same amount of butter instead of palm shortening.  

Saturday, December 19, 2015

Mini-Croissants (dairy-free)

Since it is nearly the end of 2015, I'd like to dedicate the last two posts to my favorite dessert, chocolate croissants. But first, let's learn how to bake regular croissants.

When I was on Camden's allergy free diet, I really missed eating bread. As I mastered the art of pizza dough and bao dough, I wanted to try croissant dough as well.

At first, I really hated making croissant dough. For a butter substitute, I used coconut oil which could be temperament. Can't expect much from oil when making the yeast dough, you know? The croissants were the thing of the past in my kitchen. It wasn't until I started using palm shortening for dairy substitute that I realized the potential of making a really flakey croissants again.

 
Sure enough, I was right. NOW, the croissant dough is super easy to make. Nothing more than making a pizza dough. The challenge may occur when folding laminated dough as the palm shortening may oozed out, especially in the Texas warm weather. But seriously, don't let that keep you from making some croissants from scratch. 
 
So this post will be about making the croissant dough. Then I will teach you how to make mini-croissants. Next week, I'll post a recipe for the chocolate croissants. So let's bake!!!
 
Dairy-Free Croissants Dough
 
3/4 cup (6 oz.) coconut milk  (105° to 115°F)
1 teaspoon active dry yeast
1 1/2 Tablespoons granulated sugar
1 3/4 cup (7 oz.) all-purpose flour, plus more for dusting
1/2 teaspoon sea salt
1/8 - 1/4 cup (1 - 2 oz.) palm shortening
  1. In a large bowl, mix the milk, yeast, and sugar. Set aside until the mixture is foamy, about 5 to 10 minutes, depending on a room temperature.
  2. In another bowl, sift together the flour and salt.
  3. Add the flour to the yeast mixture.
  4. Mix until the dough is formed.
  5. Knead the dough on the non-stick mat until it comes together, about a minute.
  6. Place the dough back into a bowl and allow it to rest to double its size, about an hour, depending on a room temperature.
  7. Once ready, knead the dough again. 
  8. Place the dough on the non-stick mat. Dust the dough with flour as needed to prevent sticking.
  9. Roll the dough out to about 9 by 15 inch (original size). TIP: No need to be accurate as the dough will need to be measure and cut to size.
  10. Spread the shortening over the left half of the dough, making sure to leave about 1/2 inch boarder (see picture 1). NOTE: I use about 1.5 oz. palm shortening. The more shortening, the more flakey the croissants will be.
  11. Fold the other half of the dough over to shortening.
  12. Press to seal the edges.
  13. Fold it again from the short side.
  14. Roll out the dough to the original size, careful not the allow the shortening to ooze out of the dough. TIP: During the summer, place the dough in the fridge for about 5 to 10 minutes to allow the shortening to harden a bit.
  15. Fold the dough half way then roll out the dough to the original size. NOTE: As the dough is folded over and over again, the dough will have more layers. When baked, the layers will puff up and create that classic croissant layers.
  16. The dough is ready to use in making savory and sweet croissants.
Mini-Croissants
makes 16

1 croissant dough
1/2 cup warm water
1 teaspoon baking soda
  1. Line the baking pan with non-stick mat or parchment paper. TIP: Be sure to use baking pan with rims so the melted shortening will stay inside the pan and not drip on to the oven floor.
  2. Roll the croissant dough out to 9 x 15 inch.
  3. Cut the dough into 8 equal part (see picture 2).
  4. For each square, cut it into 2 triangles.
  5. Starting from the long side, roll the dough upward to meet the short end.
  6. Place it on the prepared pan then curve the shape a bit to take on the classic croissant shape.
  7. Repeat with the rest of the dough.
  8. Allow the dough to rest in the fridge for 20 minutes. NOTE: In a hurry? Go head and preheat the oven while the dough is resting in the fridge (or at a room temperature during winter months).
  9. Once ready, preheat the oven to 400F degrees.
  10. Make the baking soda wash by dissolving the baking soda to warm water.
  11. Brush the baking soda wash over the croissant dough.
  12. Bake in the preheated oven until golden brown, about 15 minutes.
  13. Allow the croissants to rest for 5 minutes. Enjoy them while they are piping hot or warm.
STORING: Keep the mini-croissants in a container at a room temperature for up to 3 days or in the fridge for up to 7 days.

Allergy Info: These mini-croissants are free from or can be made without dairy, egg, corn, legume (soy or peanuts), nuts (not palm), and fish. If you don't have dairy allergy, you can go ahead and use the same amount of butter instead of palm shortening.